How to avoid window installation mistakes that lead to mold
Any window or door installation is more than just a job well done. It is also a responsibility. Because any mistake or shortcoming can affect not only the appearance, but also the functionality. One of the biggest problems is mold and mildew around windows. No one wants to receive a call from an investor a few months after the work has been completed, complaining that something went wrong.
That’s why today we’re writing about how to avoid it. How to make the window installation tight, solid and, most importantly, durable. Let’s focus on the details that are key to getting well-installed windows without the risk of mold.
Table of Contents
- What causes mold in windows?
- The right foam – the key to success
- Remember to spray single-component polyurethane foam with water
- Securing PU foam – because moisture never sleeps
- Thermal bridges – the number one enemy of windows and the friend of mold
- Investors increasingly aware
- Paying attention to detail to prevent mold around your windows
What causes mold in windows?
Beautiful, new windows, and after a few months, the customer begins to notice dark spots around the frame. This is the first sign that something has gone wrong. The culprit is usually thermal bridging, the places where heat “escapes” to the outside and instead moisture enters the interior. The result is condensation, and from there it’s a short step to mold and mildew around the windows.
But thermal bridges do not appear out of nowhere. They occur when the installation is not done properly.
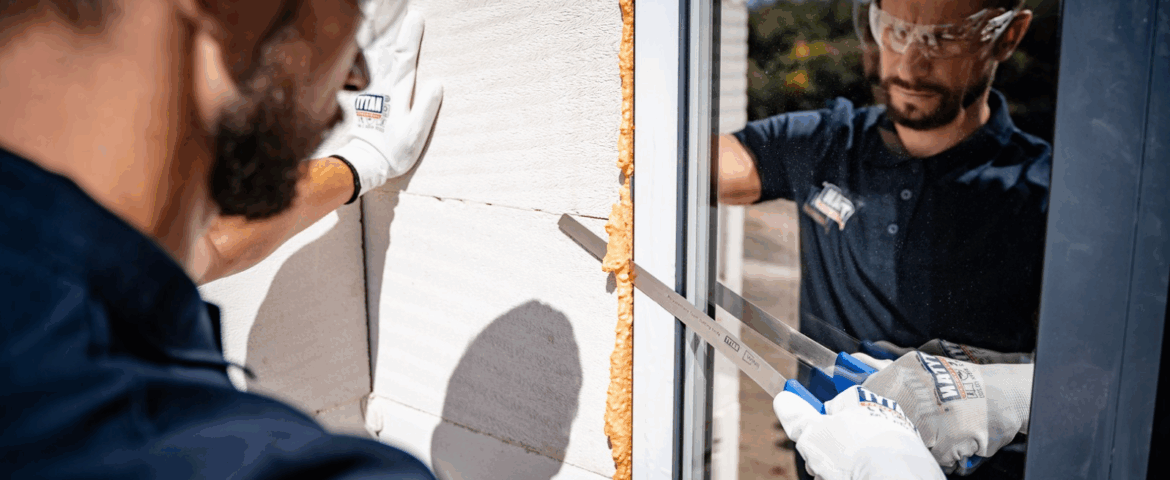
The right foam – the key to success
Let’s start with the basics – polyurethane foam. It is the first line of defense between the window frame and the wall. Not all foam is created equal. Depending on the installation conditions, you need to choose a product for your specific situation. Summer installation? Use summer foam, which can be successfully installed at temperatures above 5 degrees C. Installing in winter? Choose a foam that will perform well in freezing temperatures down to -20 degrees C. Or maybe the weather conditions are unstable? Then multi-season foams are the best choice. They are effective in temperatures as low as -10 degrees C.
Most importantly, the foam must be well mixed before application. Sounds trivial? Perhaps, but if the components in the can do not combine evenly, you can be sure that the effect will not be what you expect, and mold may appear around the windows over time. At least 30 times – that’s how many times you need to shake the can to make sure everything combines as it should. Remember to be precise when applying. The gap must be filled 100%, otherwise air infiltration will start and it’s only a step to condensation.


Remember to spray single-component polyurethane foam with water
Another equally important step is wetting the surface, which should be done before and after applying the PU foam at temperatures above zero degrees. If you skip this step, the quality of the seal can deteriorate significantly and mold can form around the windows.
Lack of adequate moisture increases the risk of irregular foam cell structure, which in turn leads to the formation of voids in the insulation. Voids in foam are weaknesses that reduce its insulating properties, both thermal and acoustic. Regular, homogeneous cell structure is the key to effective insulation, and without it, air infiltration and reduced airtightness can occur.
Securing PU foam – because moisture never sleeps
Properly applied foam is one thing, but it’s only half the battle. You must remember to protect it properly. How do you do that? Enter Titan WINS Flex and its liquid films. This special system has one job – to keep the foam in perfect condition for years to come.
From the outside, the foam should be protected from UV rays, which are the cause of its gradual degradation. The WINS system offers coatings that provide protection for up to 10 years, which is crucial, especially when it comes to solar radiation. But that’s not all – you also need to protect the foam from rainwater. If moisture gets into the joint, sooner or later there will be a problem.
Thermal bridges – the number one enemy of windows and the friend of mold
And what about the interior? Here it is important that the coating you apply is vapor-tight. In the WINS system, we have special liquid films that block the influx of moisture from the inside, while allowing the joint to breathe on the outside. This ensures that moisture does not penetrate the foam, and if it does, it is efficiently removed.
The key here is proper application of the inner and outer foils. Never mix them up! If you put the outer film on the inside and the inner film on the outside, moisture can get into the foam and it will lose its properties and the thermal insulation will no longer do its job. Moisture that gets into the foam will begin to significantly reduce the insulating properties, which in turn will promote condensation and, as a result, mold growth around the windows.
Investors increasingly aware
It is worth mentioning that customers are becoming more aware. It is increasingly common for investors to use thermal imaging cameras or building air-tightness tests to check how well the window joinery has been installed. And they have every right to do so – windows today are a significant investment, so no one wants to take any chances. If the installation is not done accurately, it will surely come out. And then you, the contractor, are the one with the problem.
Paying attention to detail to prevent mold around your windows
How do you avoid claims due to moldy windows? The right foam, proper application, interior and exterior film protection – it all matters. Following the manufacturer’s guidelines and doing the job precisely will be your greatest ally. And if you do everything according to technical recommendations, you can be sure that investors will be satisfied and you will avoid unnecessary complaints.